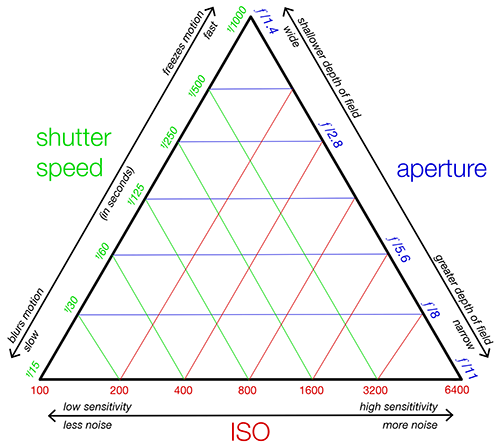
The “exposure triangle”
Taking a photo is all about managing light. By correctly balancing the three sides of the exposure triangle – aperture, shutter speed and ISO – you will make sure you get the exposure and image you want. Before we explore these 3 elements in more detail (below), it’s worth saying that most people don’t need to balance all 3, because cameras can manage at least one side of the triangle for you.
Your DSLR or mirrorless camera will have several settings for controlling these 3 elements. Usually there’s a dial placed very visibly on the top of your camera. The labels on the dial vary a little, according to your brand of camera, but in general there are 4 settings:
- Aperture priority – Depending on the effects you want and/or the prevailing conditions, you set the aperture to what you want, and the camera automatically controls your shutter speed so you don’t have to. As for the 3rd element, the ISO, you can either set it yourself or set it to ‘automatic’.
- Shutter priority – Depending on the effects you want and/or the prevailing conditions, you set the shutter speed to what you want, and the camera automatically controls your aperture so you don’t have to. As for the 3rd element, the ISO, you can either set it yourself or set it to ‘automatic’.
- Manual (often labelled ‘M’) – You set both the shutter speed and the aperture priority yourself. You can either set the ISO yourself, or set it to ‘automatic’.
- Automatic (often labelled ‘P’) – You set neither the shutter speed nor the aperture priority yourself – the camera does it all for you. This point-and-shoot setting can be a good way to start when you’re new to photography and getting used to your camera, but it sort of negates the point of having a nice camera!
1. Aperture – measured in f-stops
The f-stop relates to the width of the hole (aperture) which lets light into your camera. It is the most-used and simplest tool for changing your depth of field (the amount of the image which is in focus). A short depth of field will give you a blurry background, which can be helpful to isolate your subject (a person or bird, for example) without too many distractions behind them.
Depth of field is measured as a fraction of the focal length of the camera:
- at f2, the width of the aperture would be half the focal length of the camera
- f20 would be 1/20th the focal length of the camera (therefore, much smaller)
Therefore, f2 is a small number but a large aperture. And f20 is a larger number, but a smaller aperture.
When using f-stops to change your depth of field, therefore, a large aperture has a shallow depth of field (blurry background), while a smaller f-stop means a deeper depth of field (sharper background).
Since the value of your f-stop affects the amount of light coming into your camera, you need to balance it with other factors which also control light – ie the other 2 sides of the triangle: shutter speed and ISO. If your shutter speed is slow, it will let in more light – if you combine that with a low f-stop, you’ll get a lot of light and will potentially over-expose your image.
Depth of field can also be controlled through:
- Focal length of the lens
- Distance from the lens
because the closer an object is to the lens, the smaller the depth of field will be.
2. Shutter speed – measured in seconds/fractions
Your shutter speed dictates how long you allow light into your camera when you’re taking a photo. A fast shutter will freeze movement, while a slower one will show blur. You can use this to good effect:
- Fast shutter speeds are good for sports and action shots. They’ll make water from a fountain look like solid crystal. And the sunnier the day, the more you can shorten your shutter speed.
- Slow shutter speeds give you ‘long exposures’. This will let you blur people as they walk past a building; give you trails from car headlights at night; and let you photograph static interiors with good detail and less noise/grain in your image. You’ll usually need a tripod for slow shutter speeds, because when your shutter is open for longer, your camera will be affected by even the smallest movement.
3. ISO – sensitivity to light
The ISO rating indicates the speed of your film (in a film camera) or the sensor setting (in a digital camera).
- A lower ISO (such as 100) means letting less light in – You might do this if it’s a very bright and sunny day, or if you’re using studio lighting. If your lower ISOdoesn’t give you enough light, you’ll need to let in more by adjusting your aperture and/or shutter speed to get the correct exposure. With a lower ISO, you’ll get higher definition and less noise (the grainy effect in your image).
- A higher ISO (eg 400) means letting more light in – You might do this if you’re indoors, or it’s very overcast outdoors, or it’s night-time. A high ISO usually means more noise/grain in the resulting image, and the amount will depend on your make/model of camera or film.

